Lesson 02: Installing MySQL

Notes/errata/updates for Chapter 2:
See the official book errata at http://tahaghoghi.com/LearningMySQL/errata.php – Chapter 2 includes pages 9-93 (but we skip pages 83-92). It seems like a lot of pages, however you will skip the operating systems that do not apply to you. Do NOT compile or install from tarball or source; just use the packages that are pre-made. You will want the latest version of MySQL, which at the time of this writing is MySQL 5.7.

You should install the latest version of MySQL, which can be downloaded from http://dev.mysql.com/downloads/mysql/ If you want to install something else, you can install MariaDB or Percona’s patched version.

Note that you do NOT need to install Apache, Perl or PHP. You can skip pages 83-92.

On p. 10, it says that “The MySQL Manual says that you can get a performance increase of up to 30 percent if you compile the code with the ideal settings for your environment.” This was true up through MySQL 5.1 (see http://dev.mysql.com/doc/refman/5.1/en/compile-and-link-options.html) However, with MySQL 5.5 and newer, this is no longer true.

On p. 62, it talks about checking to make sure the mysql user and group are on the machine by using NetInfo Manager. The NetInfo Manager was taken out of Mac OS X Leopard (10.7) and above. Just skip the paragraph starting “To check using the NetInfo Manager”, and proceed to the paragraph with “You can instead check these settings from the shell prompt.”

On p. 71, it talks about the MySQL Migration Toolkit and says it’s part of the “MySQL GUI Tools Bundle”. These days, it’s part of MySQL Workbench.

On p. 75 -78, the book talks about setting your path, which probably should be under “configuration” instead of the troubleshooting section…you might think once you get MySQL installed, you can skip that section, but you need to read it anyway.

On p. 93, it lists http://forge.mysql.com as a resource, but that website has been deprecated since the book was published.

Topics covered:
Installing MySQL on Linux, Mac OS X and Windows.

Verifying packages with MD5

Configuring a new server

Reference/Quick Links for MySQL Marinate

MySQL Marinate Quick Links

Here is a quick reference for MySQL Marinate:

How to Submit MySQL Marinate Homework

We will be submitting the homework via GitHub. The reason for this is to have a centralized place for homework, as well as teaching how to use a revision control system and how to interact specifically with GitHub.

Reading:
Learn about git at http://git-scm.com/book/en/Getting-Started-Git-Basics (You only need to read this one webpage, no need to go to the next page)

To do:
– Create a github account at www.github.com if you do not already have one.
– Install and configure git on your local machine as per https://help.github.com/articles/set-up-git
– Fork the MySQL Marinate repo as per https://help.github.com/articles/fork-a-repo
The URL for the MySQL Marinate repo is https://github.com/Sheeri/mysql-marinate

– To demonstrate that you can submit homework, open and modify the 01Intro/homework.txt file
– Then commit your work locally:
git add 01Intro/homework.txt
git commit

– When you’re done, commit your work up to the github server:
git push origin master

When doing homework, remember to commit locally often. I would recommend committing up to the github server whenever you finish a question or a part of a question. Pretend at any time your local machine may die; how much work are you willing to lose? (5 minutes’ worth? 3 days’ worth?) I do not look at individual commits, only the final pull request when you’re done.

When you’re done with your homework, submit a Pull Request as per https://help.github.com/articles/using-pull-requests

If you have trouble and need help, ask away in the comments!

Reference/Quick Links for MySQL Marinate

Lesson 01: Introduction and Submitting Homework

This is for chapter 1 of Learning MySQL – it’s only pages 3-8, so it is an easy one!

Homework for this week: How to Submit Homework

Notes/errata/updates for Chapter 1:
The book mentions MySQL AB, the company behind MySQL. Since the book was written, MySQL was acquired by Sun, and then Sun was acquired by Oracle. (see http://en.wikipedia.org/wiki/MySQL#History­ for the timeline).

Topics covered:
MySQL History
Why MySQL is popular
Submitting Homework

Reference/Quick Links for MySQL Marinate

MySQL Marinate – So you want to learn MySQL! – START HERE

Want to learn or refresh yourself on MySQL? MySQL Marinate is the FREE virtual self-study group is for you!

MySQL Marinate quick links if you know what it is all about.

This is for beginners – If you have no experience with MySQL, or if you are a developer that wants to learn how to administer MySQL, or an administrator that wants to learn how to query MySQL, this course is what you want. If you are not a beginner, you will likely still learn some nuances, and it will be easy and fast to do. If you have absolutely zero experience with MySQL, this is perfect for you. The first few chapters walk you through getting and installing MySQL, so all you need is a computer and the book.

The format of a virtual self-study group is as follows:
Each participant acquires the same textbook (Learning MySQL, the “butterfly O’Reilly book”, published 2007). You can acquire the textbook however you want (e.g. from the libary or from a friend, hard copy or online). Yes, the book is old, but SQL dates back to at least the 1970’s and the basics haven’t changed! There are notes and errata for each chapter so you will have updated information. The book looks like this:

O'Reilly Butterfly book picture
O’Reilly Butterfly book picture

Each participant commits to reading each chapter (we suggest one chapter per week as a good deadline), complete the exercises and post a link to the completed work.

Each participant obtains assistance by posting questions to the comments on a particular chapter.

Note: There is no classroom instruction.

How do I get started?

– Watch sheeri.com each week for the chapters to be posted.

– Get Learning MySQL
Acquire a book (the only item that may cost money). Simply acquire Learning MySQL – see if your local library has it, if someone is selling their copy, or buy it new.

– Start!
When your book arrives, start your virtual learning by reading one chapter per week. Complete the exercises; if you have any questions, comments or want to learn more in-depth, that’s what the comments for!

FAQs:
Q: Does this cover the Percona patch set or MariaDB forks?

A: This covers the basics of MySQL, which are applicable to Percona’s patched MySQL or MariaDB builds, as well as newer versions of MySQL.

Q: What do I need in order to complete the course?

A: All you need is the book and access to a computer, preferably one that you have control over. Windows, Mac OS X or Unix/Linux will work. A Chromebook or tablet is not recommended for this course.

Q: Where can I put completed assignments?

A: Completed assignments get uploaded to github. See How to Submit Homework

Q: The book was published in 2007. Isn’t that a bit old?

A: Yes! The basics are still accurate, and we will let you know what in the book is outdated. I have contacted O’Reilly, offering to produce a new edition, and they are not interested in updating the book. We will also have optional supplemental material (blog posts, videos, slides) for those who want to learn more right away. We are confident that this self-study course will make you ready to dive into other, more advanced material.

Soak it in!

Reference/Quick Links for MySQL Marinate

Cost/Benefit Analysis of a MySQL Index

We all know that if we add a MySQL index to speed up a read, we end up making writes slower. How often do we do the analysis to look at how much more work is done?

Recently, a developer came to me and wanted to add an index to a very large table (hundreds of gigabytes) to speed up a query. We did some testing on a moderately used server:

Set long_query_time to 0 and turn slow query logging on
Turn slow query logging off after 30 minutes.

Add the index (was on a single field)

Repeat the slow query logging for 30 minutes at a similar time frame (in our case, we did middle of the day usage on a Tuesday and Wednesday, when the database is heavily used).

Then I looked at the write analysis – there were no DELETEs, no UPDATEs that updated the indexed field, and no UPDATEs that used the indexed field in the filtering. There were only INSERTs, and with the help of pt-query-digest, here’s what I found:

INSERT analysis:
Query hash 0xFD7…..
Count: 2627 before, 2093 after
Exec time:
– avg – 299us before, 369us after (70us slower)
– 95% – 445 us before, 596us after
– median – 273us before, 301us after

I extrapolated the average per query to 2400 queries, and got:
**Total, based on 2400 queries – 71.76ms before, 88.56ms after, 16.8ms longer**

There was only one read query that used the indexed field for ORDER BY (or anywhere at all!), so the read analysis was also simple:

Read analysis:
Query hash 0xF94……
Count:187 before, 131 after
Exec time:
– avg – 9ms before, 8ms after. 1 ms saved
– 95% – 20ms before, 16 ms after
– median – 9ms before, 8 ms after

Again, extrapolating to average for 150 queries:
**Total, based on 150 queries: 150ms saved**

So we can see in this case, the index created a delay of 16.8 ms in a half-hour timeframe, but saved 150 ms in reads.

It is also impressive that the write index added very little time – 70 microseconds – but saved so much time – 1 millisecond – that there were 16 times the number of writes than reads, but we still had huge improvement, especially given the cost.

I cannot make a blanket statement, that this kind of index will always have this kind of profile – very tiny write cost for a very large read savings – but I am glad I did this analysis and would love to do it more in the future, to see what the real costs and savings are.

LDAP with auth_pam and PHP to authenticate against MySQL

Edited to add a link to the Python version.

In the quest to secure MySQL as well as ease the number of complicated passwords to remember, many organizations are looking into external authentication, especially using LDAP. For free and open source, Percona’s PAM authentication plugin is the standard option.

tl;dr is I go through how to compile php-cli for use with auth_pam plugin.

Background


There are two plugins that can be used. From the documentation, the two plugins are:

  • Full PAM plugin called auth_pam. This plugin uses dialog.so. It fully supports the PAM protocol with arbitrary communication between client and server.
  • Oracle-compatible PAM called auth_pam_compat. This plugin uses mysql_clear_password which is a part of Oracle MySQL client. It also has some limitations, such as, it supports only one password input. You must use -p option in order to pass the password to auth_pam_compat.

Percona’s MySQL client supports both plugins natively. That is, you can use auth_pam or auth_pam_compat and use the “mysql” tool (or “mysqldump”, or mysql_upgrade, etc.) and you are good to go. Given the choice, we would all use auth_pam, under which clients DO NOT use mysql_clear_password.

Not all clients support auth_pam, which is the main problem. Workarounds have called for using auth_pam_compat over SSL, which is a perfectly reasonable way to handle the risk of cleartext passwords – encrypt the connection.

However, what if you want to use auth_pam?

The problem with auth_pam

Back in 2013, Percona posted about how to install and configure auth_pam and auth_pam_compat. I will not rehash that setup, except to say that most organizations no longer use /etc/shadow, so the setup involves getting the correct /etc/pam.d/mysqld in place on the server.

That article has this gem:

As of now, only Percona Server’s mysql client and an older version of HeidiSQL(version 7), a GUI MySQL client for Windows, are able to authenticate over PAM via the auth_pam plugin by default.

So, if you try to connect to MySQL using Perl, PHP, Ruby, Python and the like, you will receive this error: “Client does not support authentication protocol requested by server; consider upgrading MySQL client.”

Fast forward 4 years, to now, and this is still an issue. Happily, the article goes on to explain how to recompile clients to get them to work:

The good news is that if the client uses libmysqlclient library to connect via MySQL, you can recompile the client’s source code to use the libmysqlclient library of Percona Server to make it compatible. This involves installing Percona Server development library, compiler tools, and development libraries followed by compiling and installing the client’s source code.

And, it helpfully goes step by step on how to recompile perl-DBD-mysql to get it working with LDAP authentication (as well as without – it still works for users who do not use LDAP).

But what if you are using PHP to connect to MySQL?

PHP and auth_pam


If you try to connect, you get this error:
SQLSTATE[HY000] [2054] The server requested authentication method unknown to the client

So let us try to mirror the perl recompilation process in PHP.

Step 1

“Install Percona yum repository and Percona Server development library.” This is not a problem, do what you need to do to install Percona-Server-devel for your version.

Step 2

Install a package manager so you can build a package – optional, but useful, if you ever want to have this new client without having to recompile. As in the example, I chose the RPM package manager, so I installed rpm-build.

Step 3

Download and install the source RPM for the client package. This is where I started running into trouble. What I did not realize was that PHP does not divide out its packages like Perl does. Well, it does, but php-mysqlnd is compiled as part of the core, even though it is a separate package.

Downloading the main PHP package


So I downloaded the source RPM for PHP at https://rpms.remirepo.net/SRPMS/, and installed it into the sources directory:
cd SRPMS
wget https://rpms.remirepo.net/SRPMS/php-7.0.22-2.remi.src.rpm
cd ../SOURCES
rpm -Uvh ../SRPMS/php-7.0.22-2.remi.src.rpm

This unpacks a main file, php-7.0.22.tar.xz, plus a bunch of supplemental files (like patches, etc).

What it does NOT contain is a spec file, which is critical for building the packages.

Getting a spec file


I searched around and found one at https://github.com/iuscommunity-pkg/php70u/blob/master/SPECS/php70u.spec – this is for 7.0.21, so beware of using different versions of spec files and source code. Once that was done, I changed the mysql lines to /usr/bin/mysql_config as per Choosing a MySQL library. Note that I went with the “not recommended” library, but in this case, we WANT to compile with libmysqlclient.

Compiling php-cli, not php-mysqlnd


In addition, I discovered that compiling php-mysqlnd with the new libraries did not work. Perhaps it was something I did wrong, as at that point I was still compiling the whole PHP package and every module in it.

However, what I *did* discover is that if I recompiled the php-cli package with libmysqlclient, I was able to get a connection via PHP using LDAP authentication, via a tool written by someone else – with no changes to the tool.

Final spec file


So here is the spec file I eventually came up with. I welcome any optimizations to be made!

Step 4

“Install compilers and dependencies”.
On my host I had to do a bunch of installations to get the requirements installed (your mileage may vary), including the Percona Server package for the /usr/lib64/mysql/plugin/dialog.so file:
yum install Percona-Server-server-55-5.5.55-rel38.8.el6.x86_64 libtool systemtap-sdt-devel unixODBC-devel

Step 5

“Build the RPM file”. Such an easy step, but it took about a week of back and forth with building the RPM file (which configures, tests and packages up everything), so I went between this step and updating the spec file a lot.


rpmbuild -bb /root/rpmbuild/SPECS/php-cli.spec

Then I installed my PHP file and tested it, and it worked!
# rpm -e php-cli –nodeps
# rpm -Uvh /root/rpmbuild/RPMS/x86_64/php70u-cli-7.0.22-2.ius.el6.x86_64.rpm –nodeps
Preparing… ########################################### [100%]
1:php70u-cli ########################################### [100%]

I hope you have similar success, and if you have updates to the spec files and lists of packages to install, please let me know!
Query Reviews (part 2): pt-query-digest

Query reviews (part 1): Overview

The 1st post in the series gave an overview of what a query review is and the value they can bring you. So now let’s talk about how one is done, specifically, how to do a query review using pt-query-digest.

The point of a query review is that it is a comprehensive review of queries. Imagine if you could get a list of all queries that run on your system, and then you systematically looked at each query to determine if it is optimized. That is the basic concept behind a query review.

So, how do you get a list of queries?

pt-query-digest can use a slow query log, binary log, general log or tcpdump. I usually use a slow query log with long_query_time set to 0, so I can capture all the successful queries and their timings. If this is too much overhead, consider using Percona Server’s log_slow_rate_limit and log_slow_rate_type parameters to only log every nth session/query. This means that if you have 5000 queries per second, you can set the slow logging rate to every 100th query, and reduce the write overhead for the slow query log to 50 queries per second (instead of all 5000 queries).

So you have your log, now what? Well, we need to process it. The –type option is where you set what your log type is (binlog, genlog, slowlog, tcpdump). Default is slowlog.

By default, pt-query-digest will give you a report of the top 95% worst queries. You can change that with the –limit parameter – note that –limit just limits the output; pt-query-digest still processes all the queries in the log file. If –limit is followed by an integer, it will limit the output to the top X queries; if it’s followed by a percentage (e.g. 10%) it will output the top percentage of queries.

As this is a query review of all queries, we will want to set the limit to 100%.

There are a lot of other options that pt-query-digest has, but many of them are there so we can distill and get queries that meet a certain criteria. The point of a query review is to look at ALL queries, so we do not need to use those options.

In fact, the only other options we need are related to the review itself. Because a review is systematic, we need a place to store information related to the review. How about a database for that? In fact, pt-query-digest has a –review option that takes parameters to store the information into a table.

Here is the command I recently used to start a query review. It was run from the shell commandline, and I used –no-report because I did not want anything other than the table and its rows created:
[sheeri.cabral@localhost]$ pt-query-digest --no-report --type slowlog --limit 100% --review h=localhost,u=sheeri.cabral,D=test,t=query_review --create-review-table --ask-pass mysql_slow.log

You can see that –review has a number of arguments, comma-separated, to identify a table on a host to put the queries into. I used the –create-review-table flag to create the table, since it did not already exist, and –ask-pass because I do not type in passwords in a shell command.

pt-query-digest then spends some time analyzing the file then creating and populating the table. Here’s a sample row in the table:

*************************** 1. row ***************************
checksum: 11038208160389475830
fingerprint: show global status like ?
sample: show global status like ‘innodb_deadlocks’
first_seen: 2017-06-03 11:20:59
last_seen: 2017-06-03 11:32:15
reviewed_by: NULL
reviewed_on: NULL
comments: NULL

The checksum and fingerprint are ways to make the query portable, no matter what values are used. The fingerprint takes out all the differences among iterations of the query, and puts ? in its place. So if you have a query that’s used over and over, like
SELECT first_name FROM customers WHERE id in (1,2,3)
the fingerprint would look like
SELECT first_name FROM customers WHERE id in (?+)

The sample provides a way for us to copy and paste into an EXPLAIN (or my favorite, EXPLAIN FORMAT=JSON) statement, so that we can assess the query.

So then we can go through the process of optimizing the query. In the end, this query has nothing to tweak to optimize, so I update the reviewed_on date, the reviewed_by person, and the comments:

mysql> UPDATE test.query_review set reviewed_on=NOW(), reviewed_by='sheeri.cabral', comments='no mechanism to optimize' WHERE checksum=11038208160389475830;
Query OK, 1 row affected (0.00 sec)
Rows matched: 1 Changed: 1 Warnings: 0

On to the next query – we shall get the next query that has not yet been reviewed:
mysql> select * from test.query_review where reviewed_on is null limit 1\G

If you have already done some query reviews, your WHERE clause may look something like where reviewed_on is null OR reviewed_on < NOW()-interval 6 month.

And then look at that query for optimization. Lather, rinse, repeat. This is a GREAT way to get familiar with how developers (and ORMs) are writing queries.

Some tricks and tips – first take a look at all the queries less than 50 characters or so – you can easily update those to be all set to reviewed, with whatever message you want.
mysql> select fingerprint from query_review where length(sample)<50;
+----------------------------------------------+
| fingerprint |
+----------------------------------------------+
| administrator command: Ping |
| set session `wait_timeout` = ? |
| show tables |
| rollback |
| select * from information_schema.processlist |
| select @@session.tx_isolation |
| show status |
| start transaction |
| select user() |
| show query_response_time |
| set autocommit=? |
| show full processlist |
| show databases |
| administrator command: Statistics |
| show plugins |
| show slave status |
| commit |
| set names ? |
| show global status like ? |
| administrator command: Quit |
| show /*!? global */ status |
| set names utf? |
| select @@version_comment limit ? |
| show engine innodb status |
| select database() |
+----------------------------------------------+
25 rows in set (0.00 sec)

One great feature is that you can add columns to the table. For example, maybe you want to add an “indexes” column to the table, and list the index or indexes used. Then after the query review is complete, you can look at all the indexes in use, and see if there is an index defined in a table that is NOT in use.

You can review all the queries and run a query review every 6 months or every year, to look at any new queries that have popped up, or queries that have been removed (note first_seen and last_seen in the table).

You can also see how the query performance changed over time using the –history flag to pt-query-digest, which can populate a table with statistics about each query. But that is a topic for another post!

Query reviews are excellent ways to look comprehensively at your queries, instead of just the “top 10” slow, locking, most frequent, etc. queries. The EXPLAINing is long and slow work but the results are worth it!

Why does the MySQL optimizer not do what I think it should?

In May, I presented two talks – one called “Are you getting the best out of your indexes?” and “Optimizing Queries Using EXPLAIN”. I now have slides and video for both of them.

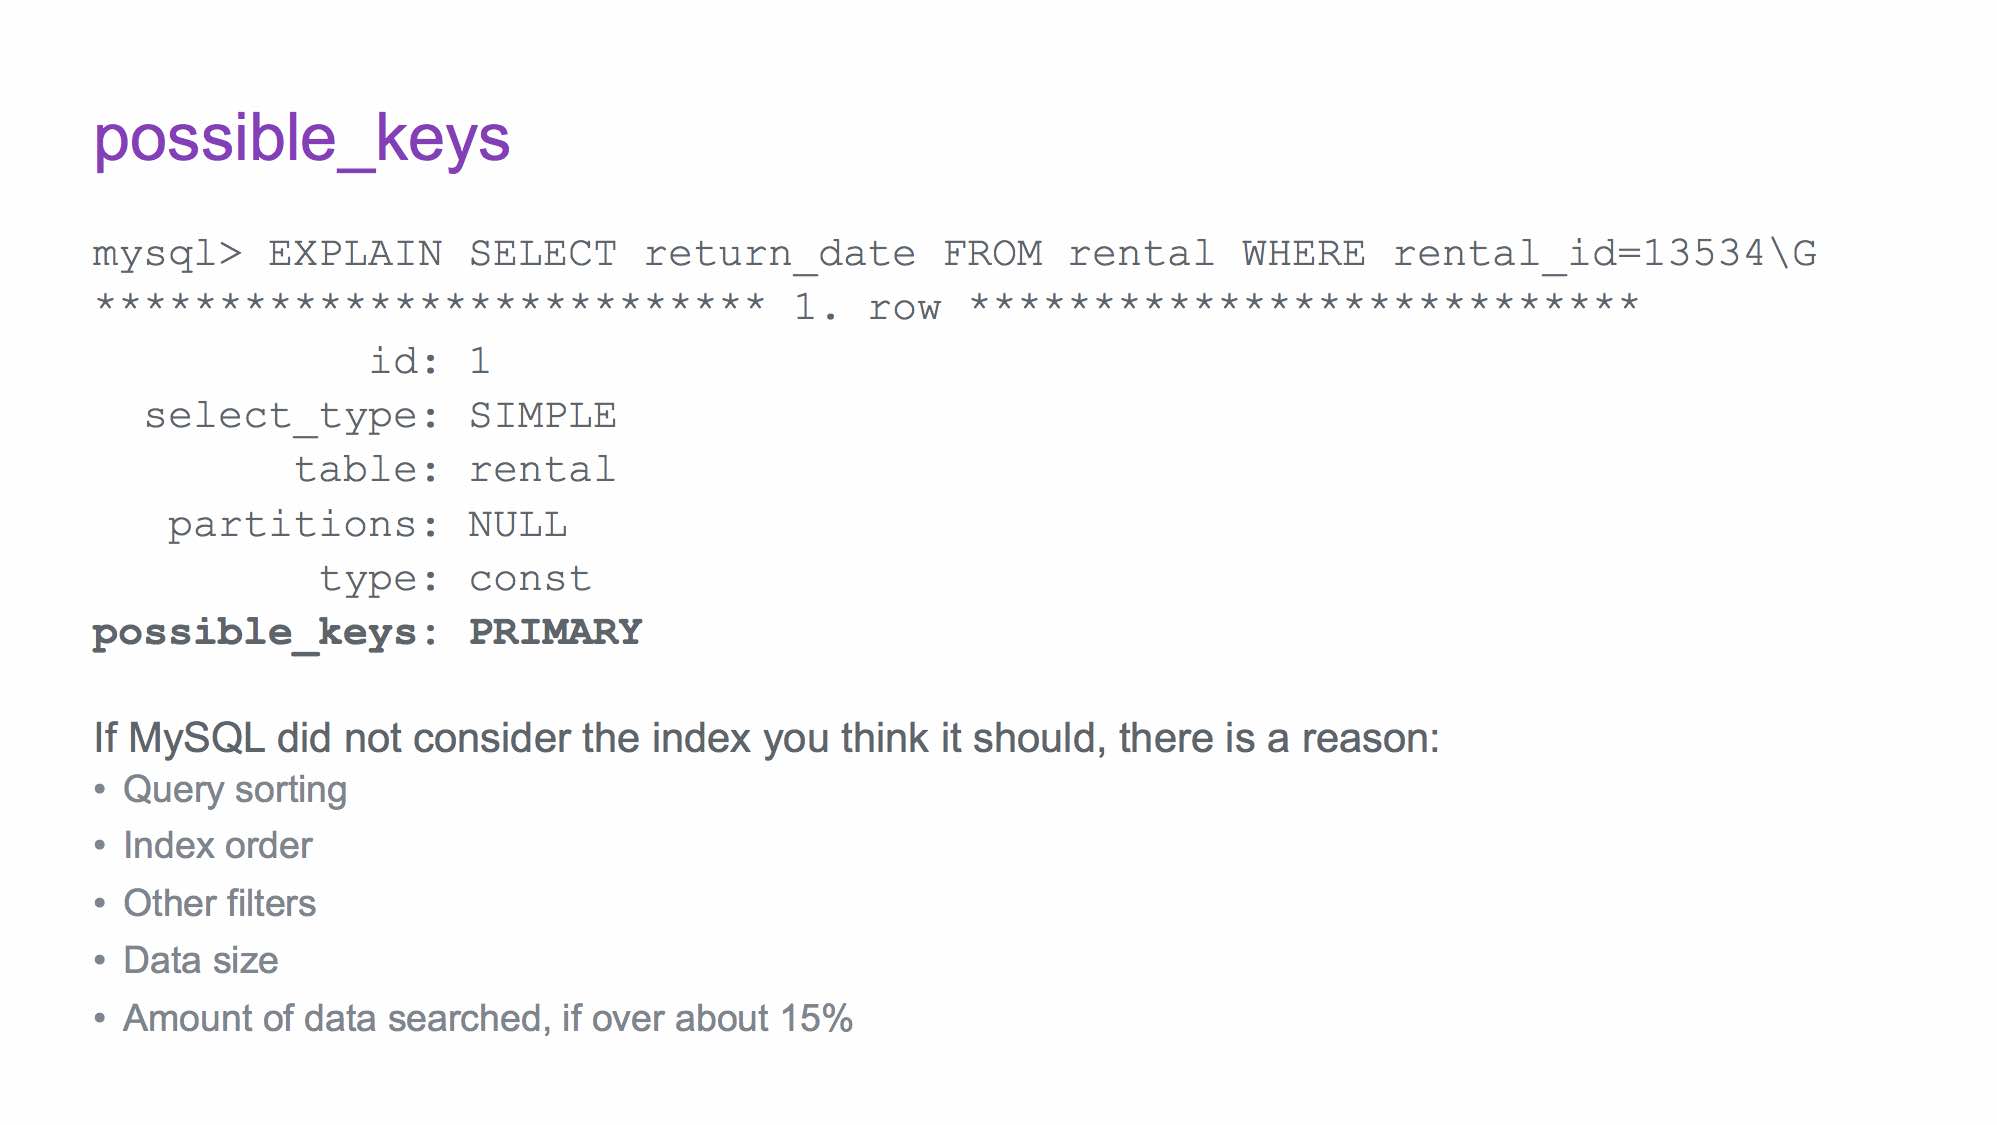
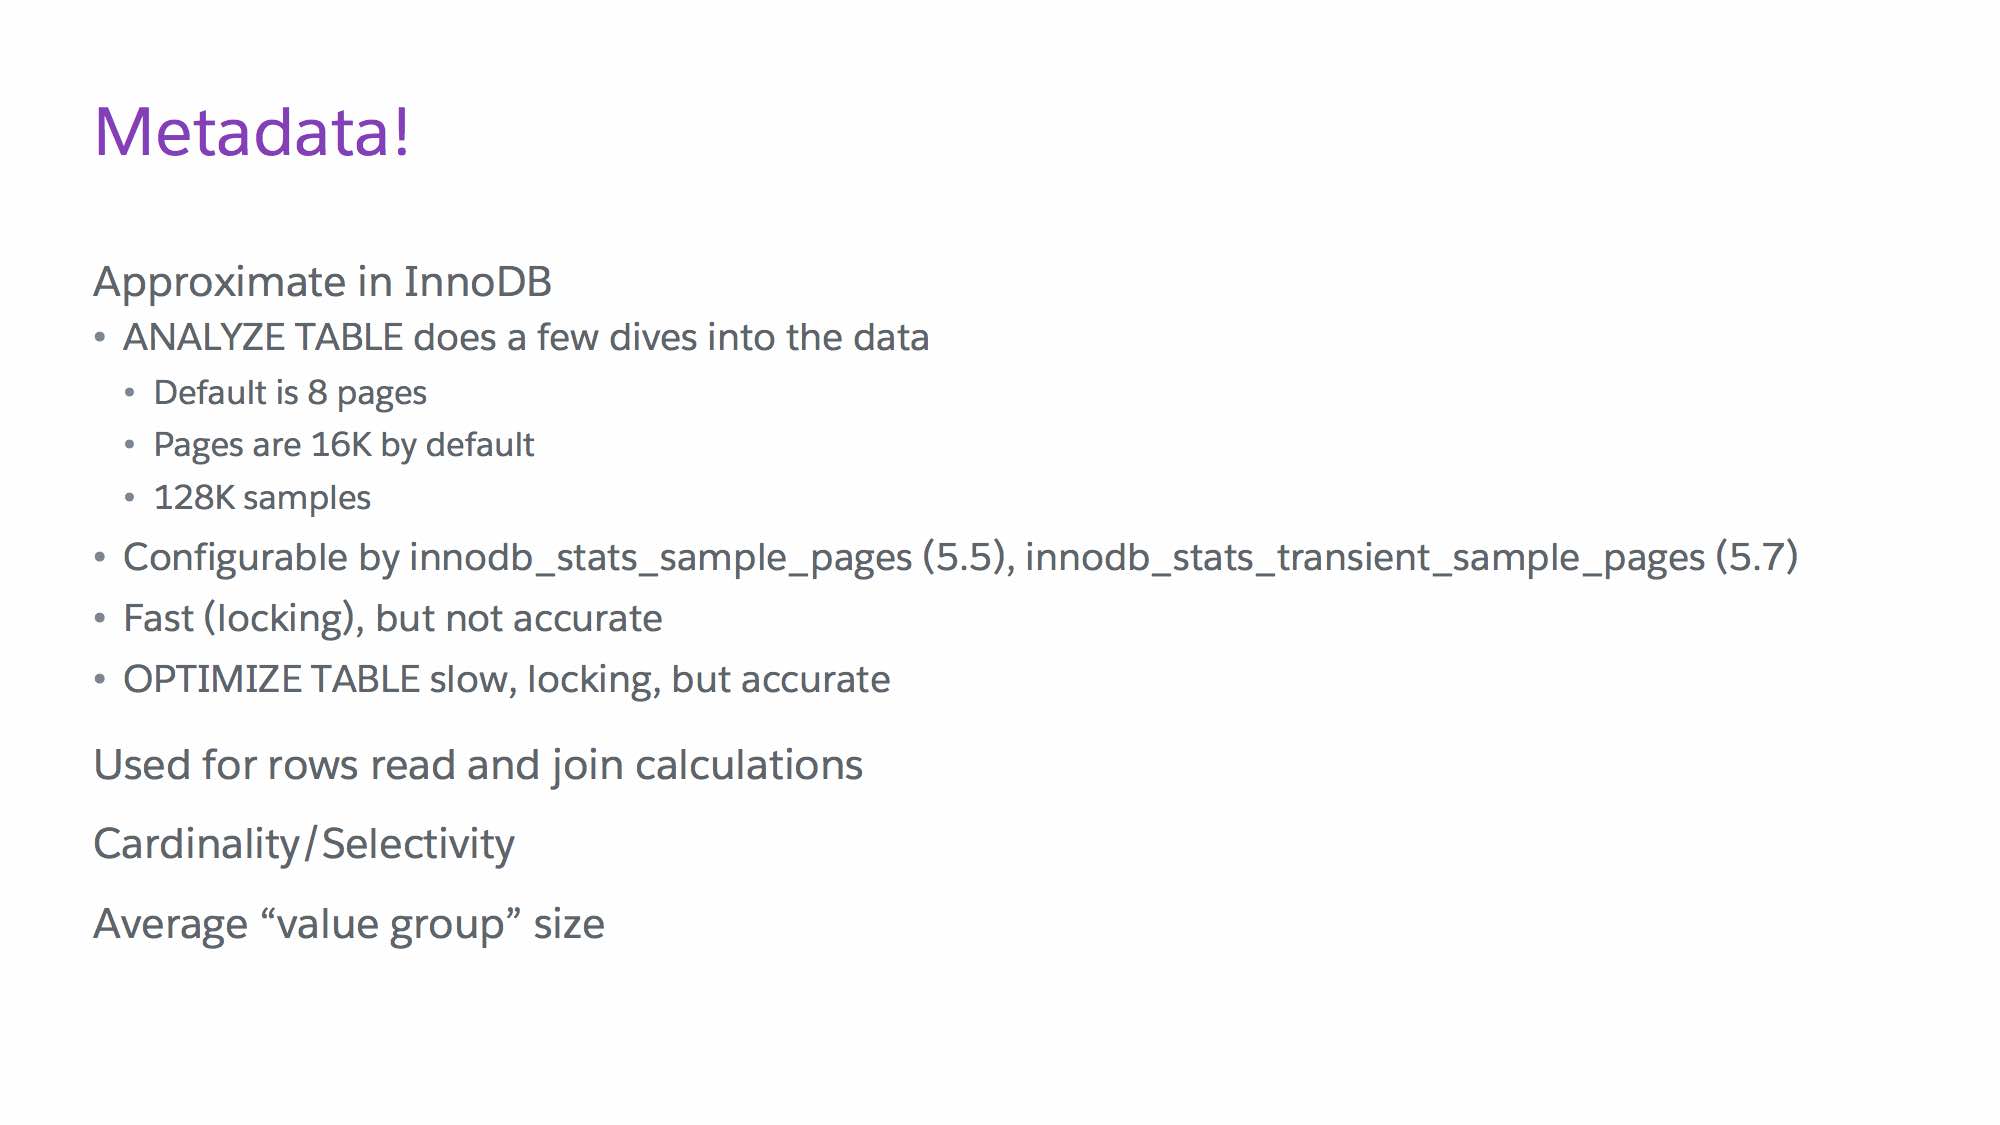
The first talk about indexing should probably be titled “Why is MySQL doing this?!!?!!?” It gives insight into why the MySQL optimizer chooses indexes that you do not expect; especially when it does not use an index you expect it to.

The talk has something for everyone – for beginners it explains B-trees and how they work, and for the more seasoned DBA it explains concepts like average value group size, and how the optimizer uses those concepts applied to metadata to make decisions.

Slides are at http://technocation.org/files/doc/2017_05_MySQLindexes.pdf.
Click the slide image below to go to the video at https://www.youtube.com/watch?v=e39-UfxQCCsSlide from MySQL indexing talk

The EXPLAIN talk goes through everything in EXPLAIN – both the regular and JSON formats – and describes what the fields mean, and how you can use them to figure out how to best optimize your query. There are examples that show where you can find red flags, so that when you EXPLAIN your own queries, you can be better prepared for gotchas. The EXPLAIN talk references the indexing talk in a few places (both talks were given to the same audience, about a week apart), so I highly recommend you watch that one first.

Slides are at http://technocation.org/files/doc/2017_05_EXPLAIN.pdf.
Click the slide image below to go to the video at https://www.youtube.com/watch?v=OlclCoWXplgSlide image from the EXPLAIN talk

Proactive MySQL: Query Reviews (part 1, overview)

Query Reviews part 2: pt-query-digest

One task that can really help reduce future problems is to do a periodic query review. I’ve been using pt-query-digest to do this since 2010 (back when it was part of Ma’atkit, mk-query-digest!), and while I have presented the idea several times at conferences, I have never blogged about it.

I am going to share a secret with you – I blog not just to share information with YOU, but to share information with ME. Future me. This comes up because I am working on a query review at Salesforce.com for one of our busiest shards. I went to go look up a blog post on using pt-query-digest, because it’s a handy cheat sheet….and….I never did it. So, here goes!

This is the first blog post in what will be a series of blog posts, because it is a long topic and there are a few tools that can be used these days for analysis.

What is a query review?
At its simplest, it’s a review of queries. In this context, a query review is where you proactively review the performance of ALL successful queries sent to a server.

Why should you do a query review?
A query review can find possibly problematic queries BEFORE they are a problem. As an example, you can easily find queries that do not use an index, and make indexes before the tables become so large that they have problems.

Another example is the case when you have a query that does the same thing over and over, many times per second – for example, a query that counts the sessions table every time a user hits the page, to say “x people online now”. That query could be rewritten to not do a count every time – maybe do a count once every minute or 5 minutes and put inside a “user count” table, and then each page hit queries that table. Or use an intermediate cache.

Another reason to do a query review is that sometimes a sample query is difficult to find.

Who should do a query review?
A query review is not for a junior DBA. You need to have some knowledge of how to optimize queries, how indexing works, when an index is valuable, and when an index is necessary. For example, a query not using an index on a text field in the “countries” table is much better than a query not using an index on an integer in the “customer” table, because countries won’t grow to be huge but hopefully your customers table will.

What does a query review look like?
Necessary for a query review is gathering “all” queries. This can be done in many ways:

  • general log – logs all queries when they are sent to the server
    • Pros
    • Built into all versions and forks of MySQL.
    • Gets ALL queries sent to the server, even ones that have an error. You can see if there are lots of queries with syntax errors, which can help find code/ORM bugs.
    • Gets ALL attempted logins, even if they fail, so it’s useful for a security/technical debt.
    • You can turn it on dynamically since….MySQL 5.1 (I think? at any rate, probably your version has it dynamic)
    • MySQL overhead
    • Cons
    • because the logging happens when they are sent, there is no indication if the query completed successfully, or how long the query took.
    • Write intensive to disk
    • Grows at a large rate
  • slow query log with long_query_time turned to 0 – gets all *successful* queries
    • Pros
    • Built into all versions and forks of MySQL.
    • Can be turned on dynamically (since, I think, MySQL 5.1, same as general log).
    • Gets lots of information, including lock timing, query execution timing, rows returned, whether the query was successful or not.
    • Cons
    • Does not get ALL attempted queries – only gets some errors (e.g., not syntax errors)
    • Does not get failed logins
    • Write intensive to disk
    • Grows at a large rate
    • MySQL overhead
  • tcpdump and other traffic sniffers (wireshark, built-in sniffers to programs like MONyog, etc)
    • Pros
    • Built into every platform
    • Gets all MySQL traffic, including attempted logins and queries with syntax errors
    • Gets information like execution time, users and hosts.
    • No additional MySQL overhead
    • Cons
    • Must be root to run tcpdump
    • Write intensive to disk
    • Grows at a large rate
  • PERFORMANCE_SCHEMA, pt-query-digest –processlist, proxies, audit logs

Well, that’s a lot of words for one blog post, so I’ll end part 1: overview here. Future posts in the series will cover how to use the tools to do a query review.